前言
:
最近在论坛上有一些朋友提出我上传的”nios2架构uclinux(nios2-linux-20080619开发包)的过程”是英文版的不好读.碰巧我最近整理资料就把架构过程重新整理了一篇.便于朋友参考. 对于英语阅读能力比较好的朋友建议参考我整理的英文版.内容比较详细.由于作者水平有限,在整理过程中难免会出现一些错误,望朋友们批评并指正.转贴的朋友请注明出处http://blog.ednchina.com/chong_lang/(本博客正在完善中欢迎交流学习)
开发环境
:
在vmware 中安装centos5.2操作系统(在网上下载安装CentOS-5 2-i386-bin-DVD )
本人所使用的开发板为: altera公司的ep2c35f672c6n
宿主机windows开发平台为: windows xp sp3
在宿主机上安装的linux开发平台为centos5.2内核为: vmlinuz-2.6.18
开发工具为:quartus7.2
安装过程
Ok! 现在开始niosii架构uclinux过程
首先要在centos下挂载window 下的一个共享目录便于centos与宿主机传送文件,不会挂载的朋友google 一下linux 下mount命令的使用
在centos操作系统上我的开发目录设在了/home/zhaozhilei
[root@localhost ~]# cd /home/zhaozhilei
安装架构uclinux时所需要的库
[root@localhost zhaozhilei]# sudo yum install git-all make gcc ncurses-devel bison byacc flex
gawk gettext ccache zlib-devel gtk2-devel lzo-devel
一.下载uclinux开发包
[root@localhost zhaozhilei]#wget ftp://ftp.altera.com/outgoing/nios2-linux-20080619.tar
二.解压nios2-linux-20080619.tar
[root@localhost zhaozhilei]# tar xf nios2-linux-20080619.tar
三.进入nios2-linux目录
[root@localhost zhaozhilei]# cd nios2-linux
ls# see what's in
binutilsgcc3READMEuClibcuse_http_for_update
checkoutinsighttoolchain-builduClinux-dist
elf2fltlinux-2.6u-bootupdate
四.检查文件是否齐全
[root@localhost nios2-linux]#./checkout
五.下载交叉编译工具
[root@localhost nios2-linux]# cd ..
[root@localhost zhaozhilei]# wget ftp://ftp.altera.com/outgoing/nios2g...080203.tar.bz2
六.解压文件
[root@localhost zhaozhilei]#sudo tar jxf nios2gcc-20080203.tar.bz2 -C /
七.添加PATH路径
[root@localhost zhaozhilei]#cd
[root@localhost ~]# vim ./bash_profile
添加:PATH=$PATH:/opt/nios2/bin (红颜色部分是要添加的部分)
八.检查是否加入PATH
[root@localhost ~]#echo $PATH
结果应为:/usr/local/sbin:/usr/local/bin:/usr/sbin:/usr/bin:/sbin:/bin:/usr/games:/opt/nios2/bin
十.检查交叉编译环境是否安装成功
[root@localhost ~]#nios2-linux-uclibc-gcc –v
结果应为:
Reading specs from /opt/nios2/lib/gcc/nios2-linux-uclibc/3.4.6/specs
Configured with: /root/buildroot/toolchain_build_nios2/gcc-3.4.6/configure --prefix=/opt/nios2 --build=i386-pc-linux-gnu --host=i386-pc-linux-gnu --target=nios2-linux-uclibc --enable-languages=c --enable-shared --disable-__cxa_atexit --enable-target-optspace --with-gnu-ld --disable-nls --enable-threads --disable-multilib --enable-cxx-flags=-static
Thread model: posix
gcc version 3.4.6
十一. 编译内核和应用,进入到uclinux-dist目录
[root@localhost ~i]#cd /home/zhaozhilei/nios2-linux
[root@localhost nios2-linux]#cd uClinux-dist
[root@localhost uClinux-dist]#make menuconfig
确保选择以下内容
Vendor/Product Selection --->
--- Select the Vendor you wish to target
Vendor (Altera)--->
--- Select the Product you wish to target
Altera Products (nios2)--->
Kernel/Library/Defaults Selection --->
--- Kernel is linux-2.6.x
Libc Version (None)--->
[*] Default all settings (lose changes)
[ ] Customize Kernel Settings
[ ] Customize Vendor/User Settings
[ ] Update Default Vendor Settings
注意:在成功引导uclinux之前不要改变上面任何设置
然后
十二 .编译硬件配置选择相应的cpu 和sdrma
[root@localhost uClinux-dist]#make vendor_hwselect SYSPTF=/配件配置目录/your_system.ptf
选择cpu出现如下图(如果是多cpu的话,根据实际情况选择)

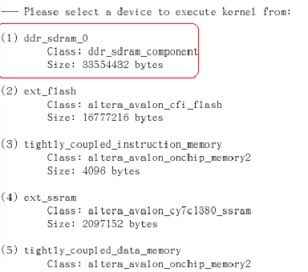
选择sdram如下图(在这里我选择的是1即ddr_sdram_0,其它根据实际情况)
十三. 编译内核和应用
[root@localhostuClinux-dis]# make(需要编译一段时间)
十四. 将 zImage文件copy到宿主机上
[root@localhost yanfa]# cp ./ images/zImage你挂载的目录
十五. 在宿主机上(windows)打开nios ii eds 7.2 commandshell
开始->程序->altera-> nios ii eds 7.2->nios ii eds 7.2 commandshell
十六.下载你的sof文件到目标板

十七. 下载zImage 到目标板

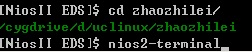
十八. 打开nios终端
十九. uclinux正确启动时应出现如下信息
Using cable "USB-Blaster [USB 2-1.2]", device 1, instance 0x00
Pausing target processor: OK
Initializing CPU cache (if present)
OK
Downloaded 1272KB in 7.7s (165.1KB/s)
Verified OK
Starting processor at address 0x00500000
# nios2-terminal
nios2-terminal: connected to hardware target using JTAG UART on cable
nios2-terminal: "USB-Blaster [USB 2-1.2]", device 1, instance 0
nios2-terminal: (Use the IDE stop button or Ctrl-C to terminate)
Uncompressing Linux... Ok, booting the kernel.
Linux version 2.6.26-rc6 (hippo@darkstar) (gcc version 3.4.6) #2 PREEMPT Mon Jun 16 14:30:09 CST 2008
uClinux/Nios II
Built 1 zonelists in Zone order, mobility grouping off.Total pages: 8128
Kernel command line:
PID hash table entries: 128 (order: 7, 512 bytes)
Dentry cache hash table entries: 4096 (order: 2, 16384 bytes)
Inode-cache hash table entries: 2048 (order: 1, 8192 bytes)
Memory available: 30136k/2333k RAM, 0k/0k ROM (1552k kernel code, 781k data)
Mount-cache hash table entries: 512
net_namespace: 180 bytes
NET: Registered protocol family 16
NET: Registered protocol family 2
IP route cache hash table entries: 1024 (order: 0, 4096 bytes)
TCP established hash table entries: 1024 (order: 1, 8192 bytes)
TCP bind hash table entries: 1024 (order: 0, 4096 bytes)
TCP: Hash tables configured (established 1024 bind 1024)
TCP reno registered
NET: Registered protocol family 1
io scheduler noop registered
io scheduler deadline registered (default)
ttyJ0 at MMIO 0x8009340 (irq = 8) is a Altera JTAG UART
console [ttyJ0] enabled
ttyS0 at MMIO 0x8008e00 (irq = 7) is a Altera UART
dm9000 Ethernet Driver, V1.30
TCP cubic registered
NET: Registered protocol family 17
RPC: Registered udp transport module.
RPC: Registered tcp transport module.
Freeing unused kernel memory: 572k freed (0x1b8000 - 0x246000)
Shell invoked to run file: /etc/rc
Command: hostname uClinux
Command: mount -t proc proc /proc
Command: mount -t sysfs sysfs /sys
Command: mount -t usbfs none /proc/bus/usb
mount: mounting none on /proc/bus/usb failed: No such file or directory
Command: mkdir /var/tmp
Command: mkdir /var/log
Command: mkdir /var/run
Command: mkdir /var/lock
Command: mkdir /var/empty
Command: ifconfig lo 127.0.0.1
Command: route add -net 127.0.0.0 netmask 255.0.0.0 lo
Command: cat /etc/motd
Welcome to
____ __
/__| ||_|
__| || | _ ________
| | | | || || |_ | | | | / /
| |_| | |__| || | | | | |_| |/
|___\____|_||_|_| |_|\____|\_/\_/
| |
|_|
呵呵, 恭喜你成功运行了uclinux操作系统现在你可以根据自己的喜好从新配置内核啦!!如下操作:
从新回到虚拟机下的uclinux-dist目录下
[root@localhost uclinux-dist]#make menuconfig
Kernel/Library/Defaults Selection --->
(linux-2.6.x) Kernel Version
(None) Libc Version
[ ] Default all settings (lose changes)
[*] Customize Kernel Settings
[*] Customize Vendor/User Settings
[ ] Update Default Vendor Settings
Then
以下可以根据自己的喜好配置内核这里不再叙述
小提示: 在配置内核的过程中如果有朋友在编译内核加入iptables 时若出现如下错误:
include/linux/netfilter_ipv4/ip_tables.h:18:28: linux/compiler.h: No such file or directory
make[3]: *** [iptables.o] 错误 1
make[3]: Leaving directory `/usr/local/yanfa/nios2-linux/uClinux-dist/user/iptables'
make[2]: *** [iptables] 错误 2
make[2]: Leaving directory `/usr/local/yanfa/nios2-linux/uClinux-dist/user'
make[1]: *** [all] 错误 2
make[1]: Leaving directory `/usr/local/yanfa/nios2-linux/uClinux-dist/user'
make: *** [subdirs] 错误 1
解决方法:
把/usr/home/zhaozhilei/nios2-linux/uClinux-dist/user/iptables/include/linux/netfilter_ipv4 中的 ip_tables.h中的#include
-
 热敏电阻温度阻值查询程序2024年11月13日 74
 -
C99语法规则2024年11月16日 675
-
 FreeRTOS 动态内存管理2024年11月12日 448
 -
一款常用buffer程序2024年11月06日 88
-
 1602液晶显示模块的应用2012年08月03日 191
 -
GNU C 9条扩展语法2024年11月18日 261
-
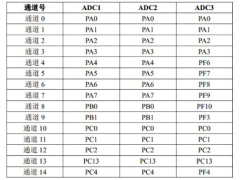 如何实现STM32F407单片机的ADC转换2024年11月15日 300
 -
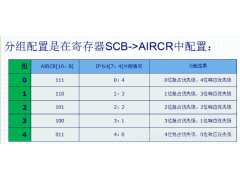 STM32使用中断屏蔽寄存器BASEPRI保护临界段2024年11月15日 195
-
C99语法规则2024年11月16日 675
-
 51单片机LED16*16点阵滚动显示2012年09月05日 664
 -
FreeRTOS 动态内存管理2024年11月12日 448
-
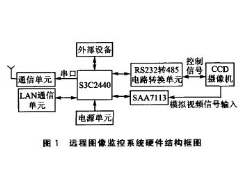 ARM9远程图像无线监控系统2012年07月03日 424
 -
 用单片机模拟2272软件解码2012年09月06日 300
 -
如何实现STM32F407单片机的ADC转换2024年11月15日 300
-
 新颖的单片机LED钟2012年08月06日 278
 -
GNU C 9条扩展语法2024年11月18日 261